10.0.0.2 is an IP address that is generally used by businesses inside their private network. Business-related routers keep the IP, such as 10.0.0.2, as the default gateway and assign 10.0.0.2 as subnet for clients. For some brands such as Siemens, Edimax, Micronet, it becomes the default gateway for login. A subnet is a subdivision of an IP network.
In a private system, making a subnet starting from 10.0.0.2 also did the job of avoiding any network conflict and facilitates the ease of communication inside a network. Since the network is vast in business, routers used at such places have 10.0.0.2 as a default gateway login, which is configured in such a way that subnet supports a client IP address beginning with 10.0.0.2.
What is the 10.0.0.2 IP Address Is Used For?
IP QoS: It allows us to set bandwidth for computers to avoid heavy load.
DNS and Proxy Settings: DNS refers to the system which converts a domain name in the machine_readable address, while proxy means the medium used for connecting two endpoint devices.
WPS: It is known as a WiFi protection system. It is a standard that helps to make wireless communication faster, secure, and more efficient.
MAC address: It provides a unique address among the hardware devices connected to a network.
LAN, WAN & WILAN Settings: Let us configure different types of area-based networks. We can use 10.0.0.2 DNS for setting the security settings.
DHCP: Dynamic host configuration protocol allows the server to assign a different address sequentially automatically.
PPEoP: It is called point-to-point over Ethernet, and it is a protocol used to establish a DSL connection to the Internet.
How to Access the 10.0.0.2 Admin Login Page
To access network settings, we need to:
Step 1 – Firstly, open a browser on the system and type 10.0.0.2 in the address bar and press enter. We will get https.//10.0.0.2 login page.
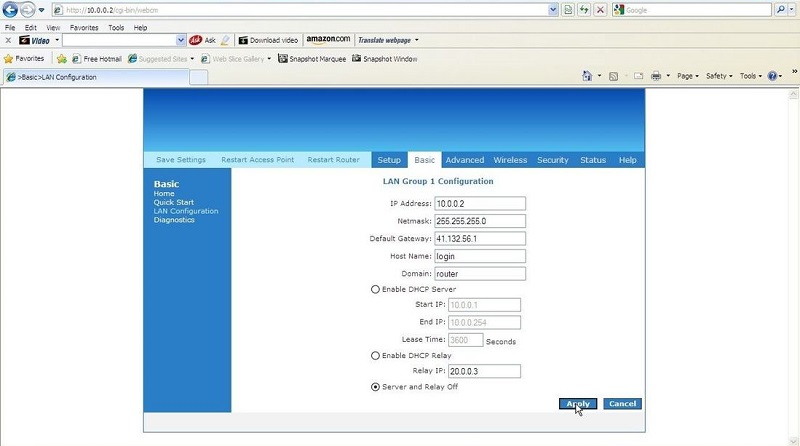
Step 2 – Now, enter the login credentials. Upon successful login, we will find router network settings.
There is also another possibility that we may not be asked to enter any details, as in the case with some other brands. Now, we may be redirected directly to the configuration settings page.
Also Read:
- 192.168.2.254 Admin Login, Username and Password
- NETGEAR Router login – www.routerlogin.net Admin Login
- 192.168.100.1 IP Login, Router Username, Password and Settings
- Things To Consider Before Buying A Best WiFi Router
- All You Need To Know About Router, How to Find IP Address, Set Up & Reboot
What to Do In Case We Don’t Remember Our Password?
In this particular case, the best way is to search Whether we have written it somewhere. Still, if we don’t find it, we have to do a reset to our router, which will configure the router to factory settings.
How to Reset the Wireless Router Password?
First, look for the reset button on our modem and press and hold for 20-30 seconds using a sharp pinpointed object. It will reset the router, and now we can log in to the router using default login details. For the users, who have never changed their default login credentials, look for the default password and username.
How to Use 10.0.0.2 IP to Login into Telkom Router
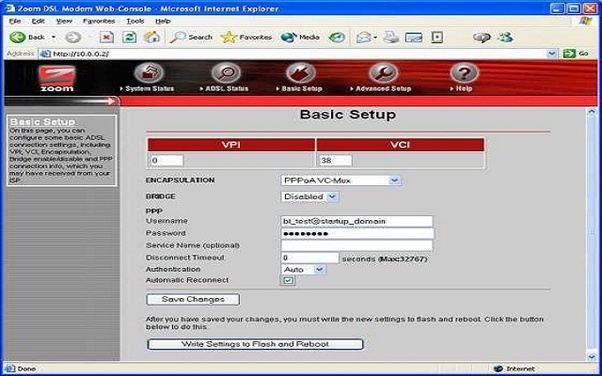
Step 1 – First of all, enter https://10.0.0.2 in the address bar of our browser.
Step 2 – Enter our router name and password and click on login.
Step 3 – Now, we have successfully logged into our router settings.
How to Recover Forgotten Telkom WiFi Password?
Telkom routers last long, and they are the best options for small office spaces and homes. As routers have default gateway IP addresses to login and access settings, we need to access it using a 10.0.0.2 IP address. Forgetting Telkom WiFi password is a widespread problem because users don’t store the credentials easily. By following the steps given below, we can get the password:
- Change the default login credentials.
- Refreshing the whole system by pressing and holding the resetting button for 30 seconds.
1. To Change the Default Login and Password
Step 1 – In the browser, enter the address https://10.0.0.2 URL.
Step 2 – On the login page, we need to enter the default username and password. The default credentials for Telkom are:
Username: blank (nothing)
Password: admin
Step 3 – Since default login is easy to get, it becomes vulnerable to hack, so the first thing to do is to set a unique username and strong alphanumeric password.
Step 4 – SSID is a service set identifier. If we left it unchanged, then anyone can guess and enter our router settings. To secure our router, we need to change the SSID to something unique, like With Mr. Or Mrs.
Step 5 – In the security tab of the routers admin tool, enable WPA2-PSK encryption as it is the current industry standard for network encryption.
2. Reset Telkom Router to Default Settings
To reset our router, we need to follow the below steps.
Step 1 – Pressing and holding the reset button with a pointed clip for 15-30 seconds.
Step 2 – Releasing the clip and then our router will be configured to default settings.
F.A.Q’s – 10.0.0.2
Q. 1 – 10.0.0.2 Is Not Loading or Working?
We should make sure that using an IP address for accessing the router admin tool is correct. If the address is correct, then there is a high possibility that:
- There is some problem in the connection of our router and PC, and ensure that the wires are connected. Make sure that the wire is connected securely.
- If nothing works, then we may opt to reset the router and start the process from fresh.
Q. 2 – How to Change the D-Link Router Password?
To change the dlink router password, we can follow the steps given below:
Step 1 – To change the password, access the page that lets us change the network settings, so open the local browser on our device, which is currently connected to the same network. Enter the address http://192.168.0.1 in our address bar. If this doesn’t work, then We can try http://dlinkrouter or http://dlinkrouter.local.
Step 2 – By default, all the Dlink Routers login username is admin, and the password is not usually assigned, so leave it blank (nothing). We will enter the settings page. Have a glance at the SETUP tab at the top and click on the wireless settings option on the left side of the screen.
Step 3 – In the settings, see for the wireless network setup at the bottom and click on it. We will see a new screen, scroll down that page where it says “wireless security mode.” Here we will see the section called Pre-shared key.
Step 4 – Here in this section, enable WPA2 security in the wireless security mode section and create a strong password. Make sure that it has alphanumeric and is long enough.
Step 5 – Once done, click on save settings option, and we are all set.
Now, we know our default gateway IP, go to HTTP://<default IP address >, we will be able to see the login page.
Q. 3 – Not Able to Login to Admin Settings (10.0.0.2 not responding)?
Usually, many users make a mistake of using the wrong IP address to get the admin settings page, and then they may get an error that says “web page not responding “.we should check if we are entering the correct IP address for our router.
For Windows Users
Step 1 – Go to Start. Click on RUN and see the CMD (command prompt).
Step 2 – Once the command prompt, a black screen appears, type ipconfig. It will show us the IP address where We should try logging in.
For MAC Users
Step 1 – Go to the search bar or press Command + Spacebar.
Step 2 – Write the terminal. A terminal screen appears, type IPconfig.
An Alternate Option for MAC Users
Step 1 – Open the Apple logo in the taskbar.
Step 2 – Click on the option system preferences and search for Network.
Once done, We will see our IP under the Status: Connected option
Now, we know the default gateway IP address, go to HTTP://<default IP> or 10.0.0.2 DNS, we will be able to see the login page.
Read More:
- 192.168.8.1 IP Login, Router Username, Password and Settings
- 192.168.15.1 IP Login, Router Username, Password and Settings
- 192.168.100.1 IP Login, Router Username, Password and Settings
- 192.168.0.254 IP Login, Router Username, Password and Settings
Conclusion
We hope this guide proves useful. Thank you for reading!